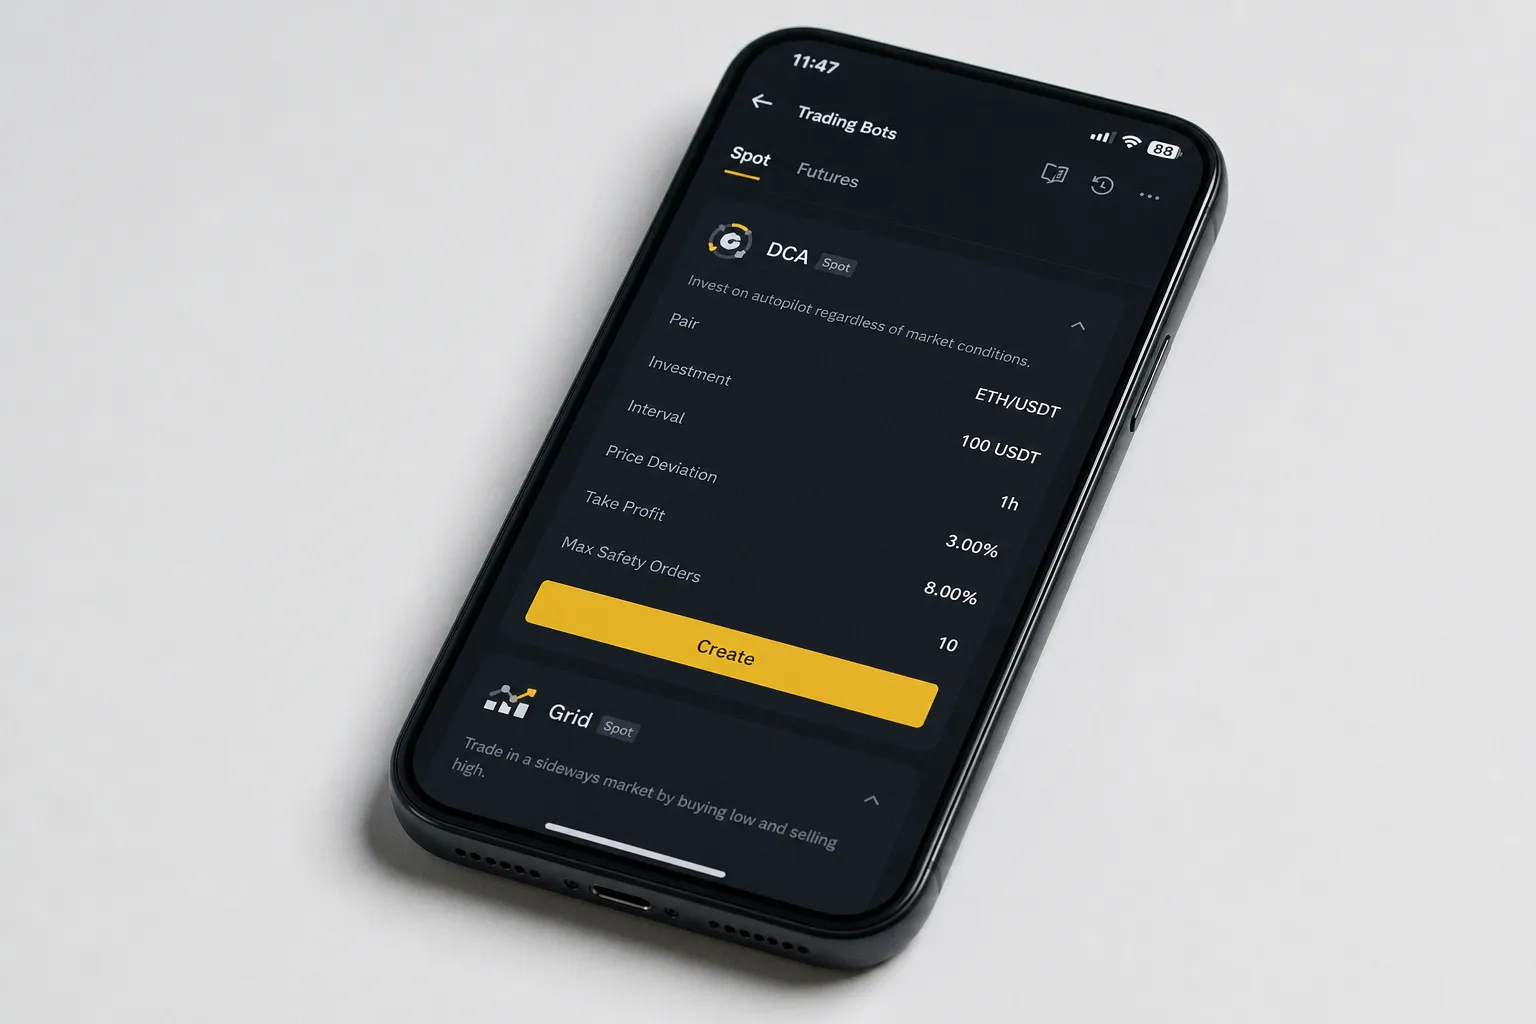
The parameters of this setup are engineered to balance capital deployment rates against the risk of premature margin exhaustion. For traders evaluating automated execution models, setting up a binance dca bot david s strategy for digital assets establishes a structured methodology for managing spot positions without manual intervention. Furthermore, setting up a binance dca bot david s strategy for ai crypto integrations or automated execution interfaces requires a clear understanding of the mathematical relationship between price deviation, order scaling, and capital preservation. What follows is a granular breakdown of each configuration axis, its rationale, and its practical implications on the Binance Spot DCA interface.
The Mechanics of Price Deviation: Triggering Buys During ETH Volatility
The fundamental trigger for any DCA safety order is price deviation. In the Binance DCA bot interface, this parameter dictates the percentage drop required from the last executed order to trigger the next purchase. A static grid buy structure risks deploying capital too rapidly during minor intraday fluctuations, whereas an excessively wide deviation results in under-allocation during brief market dips.
David's strategy utilizes a baseline price deviation of 2.5% for ETH. This value is derived from the historical daily volatility profile of Ethereum. With a standard deviation of daily returns frequently fluctuating between 3% and 5% over rolling 30-day windows, a 2.5% trigger threshold ensures that safety orders are not triggered by normal noise, but rather by actual intraday drawdowns that represent meaningful dislocations from the most recent executed price.
- Base Order Trigger: Executed immediately upon bot initialization or immediately after the previous cycle closes in profit. This establishes the initial exposure at current market price.
- Safety Order Trigger: Executed only when the asset price falls by the specified deviation percentage relative to the price of the last executed order, not the base order. This distinction matters: each subsequent safety order references the fill price of its predecessor, not the initial entry.
- Volatility Filtering: By aligning the deviation step with the asset's localized standard deviation, the bot avoids executing multiple safety orders within the same consolidation range. The goal is to stagger accumulation across distinct price levels rather than cluster entries around a single support zone.
If the price deviation is set too low (e.g., 0.5%), a minor downward swing will trigger all safety orders within hours. This leaves the bot fully allocated at the top of a larger downward trend, rendering the strategy ineffective at lowering the average entry cost. Conversely, a deviation set too high (e.g., 10%) means safety orders rarely fire — the bot behaves like a passive limit-order grid that never meaningfully reduces cost basis.
Step Multiplier: Widening the Grid Under Pressure
The Step Multiplier parameter works in tandem with Price Deviation. At a Step Multiplier of 1.0, every safety order triggers at the same 2.5% drop from the previous order. With a Step Multiplier greater than 1.0, each successive trigger requires a progressively larger percentage drop. For instance, a Step Multiplier of 1.2 would make the second safety order trigger at 3.0% (2.5% × 1.2), the third at 3.6%, and so on. David's strategy keeps the Step Multiplier at 1.0 — a linear grid — to maintain predictable order spacing in ETH's mid-cap volatility regime. This is a deliberate architectural choice: linear steps paired with exponential volume scaling (discussed below) produce a capital distribution curve that front-loads exposure proportionally while still benefitting from deeper dips.
Scaling the Position: Using Safety Order Multipliers for Deeper Dips
To optimize the average entry price during a prolonged downtrend, the bot must deploy larger amounts of capital at lower price points. This is managed through two distinct parameters: the Volume Multiplier and the Step Multiplier.
The Volume Multiplier increases the size of each successive safety order. The Step Multiplier increases the price deviation percentage required for each subsequent step. David's strategy configures the Volume Multiplier at 1.5x and the Step Multiplier at 1.0x (linear price steps with exponential capital scaling).
| Order Level | Price Deviation (Cumulative) | Order Size (USDT) | Cumulative Capital Allocated (USDT) | Average Entry Price Reduction Index |
|---|---|---|---|---|
| Base Order | 0.0% | 100.00 | 100.00 | 0.00% |
| Safety Order 1 | 2.5% | 150.00 | 250.00 | -1.50% |
| Safety Order 2 | 5.0% | 225.00 | 475.00 | -3.15% |
| Safety Order 3 | 7.5% | 337.50 | 812.50 | -4.92% |
| Safety Order 4 | 10.0% | 506.25 | 1,318.75 | -6.80% |
| Safety Order 5 | 12.5% | 759.38 | 2,078.13 | -8.76% |
| Safety Order 6 | 15.0% | 1,139.06 | 3,217.19 | -10.79% |
Using a 1.5x Volume Multiplier ensures that the average entry price is pulled closer to the current market price as the asset falls. This requires a smaller price recovery to achieve profitability. However, this geometric progression significantly increases the capital required to run the bot safely over multiple steps.
Notice how the capital curve accelerates: by Safety Order 5, each successive order is nearly 7.6× the size of the base order. This is the core trade-off of exponential scaling — each deeper dip is rewarded with disproportionately heavier accumulation, compressing the break-even point aggressively. But it also means a trader deploying this configuration on a smaller portfolio (say, 500 USDT total) would exhaust capital by Safety Order 2, leaving the bot inert for the rest of the drawdown. Portfolio sizing must match the full depth of the configured grid.
Linear vs. Exponential Volume Scaling: A Practical Comparison
| Scaling Model | Volume Multiplier | Capital at Order 5 | Average Entry Reduction at -12.5% | Best Suited For |
|---|---|---|---|---|
| Linear | 1.0x | ~$600 total | -5.9% | Conservative, low-conviction setups |
| Exponential (mild) | 1.2x | ~$980 total | -7.2% | Moderate conviction, balanced risk |
| Exponential (David's) | 1.5x | ~$2,078 total | -8.76% | High conviction, volatile assets |
| Aggressive Exponential | 2.0x | ~$4,150 total | -11.3% | Deep pockets, extreme bear-market plays |
David's 1.5x configuration sits in the upper-middle range — aggressive enough to meaningfully compress cost basis during ETH's typical 10–20% correction cycles, but not so leveraged that a 25% drawdown wipes the capital reserve without recovery options.
Defining Exit Parameters: Setting Realistic Take-Profit Targets for Automated Trades
The exit target of a DCA bot is calculated as a percentage of the average entry price, not the initial base order price. As safety orders are filled and the average entry price drops, the absolute exit price targets adjust downward dynamically.
A DCA bot does not predict trend reversals; it mathematically lowers the break-even threshold so that minor retracements trigger a full position exit.
David's strategy targets a conservative 1.5% to 2.0% Take Profit (TP) margin. While a larger target (e.g., 5% to 10%) promises higher returns per cycle, it increases the duration of capital lockup. In high-frequency volatility regimes, rapid cycling is prioritized over maximum profit per trade.
The Mathematics of Cycle Turnovers
1. Cycle Velocity: A 1.5% TP target allows the bot to close positions and free up capital quickly during minor relief rallies. In ETH's mid-range volatility, a 1.5% retracement from a DCA-compressed average entry can occur within hours to days, keeping cycle times short.
2. Reinvestment Rate: Quick exits enable the bot to initiate new base orders, compounding capital through volume rather than holding positions open for extended periods. Over 30 cycles per month, even a modest $2–$3 net profit per cycle compounds meaningfully on a $2,000 allocation.
3. Slippage and Fees: On Binance, maker/taker fees (standard 0.1%, or lower if using BNB for gas) must be subtracted from the target margin. A 1.5% net target remains highly viable even when accounting for execution slippage on high-liquidity pairs like ETH/USDT.
Take-Profit Mode: Base Order vs. Total Volume
Binance offers two TP calculation modes for Spot DCA bots. Understanding the difference is non-trivial:
- TP from Base Order: The TP percentage is applied only to the base order's entry price. This is less responsive to DCA averaging — the exit price stays anchored to the initial purchase, which means the bot may hold positions longer than necessary if multiple safety orders have lowered the average entry significantly.
- TP from Total Volume (Average Entry): The TP percentage is applied to the weighted average entry of all filled orders. This is David's chosen mode. It ensures that every safety order contributes to lowering the exit threshold, producing tighter cycle times and more frequent profitable closures.
Selecting the wrong TP mode is one of the most common misconfigurations in DCA bot deployment. The "Total Volume" mode aligns with the mathematical intent of the DCA strategy — each executed safety order should actively improve the position's exit conditions.
Capital Preservation: Managing Max Safety Orders to Avoid Over-Exposure
The primary failure point of a DCA bot is capital exhaustion during a sustained market decline. If the bot executes all available safety orders and the price continues to decline, the system ceases to accumulate. The trader is left holding a depreciating asset with no remaining liquidity to lower the average cost.
To prevent this, the configuration must define a strict limit on the number of active safety orders. David's strategy utilizes a maximum of 5 to 7 safety orders. This configuration covers a cumulative price drop of approximately 12.5% to 17.5% depending on the step configuration.
- Capital Allocation Formula: The total capital required ($C_{total}$) for a configuration using a base order ($B$), safety order size ($S$), volume multiplier ($m$), and max safety orders ($N$) is calculated as:
$$C_{total} = B + S \sum_{i=0}^{N-1} m^i$$
- Risk Margin: The remaining capital in the trading wallet must act as a buffer. Under-capitalizing the bot leads to execution failures on Binance when the API attempts to place an order that exceeds the available spot balance. A bot that cannot execute its intended safety order at a critical price level defeats the entire accumulation mechanism.
For traders looking to build configurations like this, acquiring a solid understanding of mathematical risk models is crucial. If a practitioner requires formal training in quantitative models or algorithmic setup, finding structured educational resources on platforms like okulpencerem.com provides the necessary foundational instruction. Without these analytical skills, setting up automated systems often leads to misconfigured leverage or overallocation.
The Danger of "Unlimited" Safety Orders
Some traders configure their bots with an effectively unlimited number of safety orders, assuming the asset will always recover. This is structurally unsound. Consider: at a 1.5x volume multiplier with a 150 USDT base safety order, the 10th safety order alone costs approximately $5,766 USDT, and the cumulative capital required exceeds $17,000. Few retail portfolios can sustain this without significant reallocation from other positions.
The Max Safety Orders parameter is the single most important capital preservation lever in the entire configuration. It defines the bot's "depth of field" — how far into a drawdown the strategy can function before becoming a passive bag-holder. Setting this number requires honest assessment of available liquidity, not aspirational thinking about how deep a dip might go.
Operational Workflow: Executing the Strategy within the Binance Trading Bot Interface
To deploy this configuration on the Binance platform, the parameters must be inputted precisely into the native Spot DCA interface.
Configuration Steps
1. Access the Bot Interface: Log in to the Binance account, navigate to the "Trade" dropdown menu, select "Trading Bots", and choose "Spot DCA".
2. Select Asset Pair: Choose the ETH/USDT trading pair. Spot execution is preferred over futures to eliminate liquidation risk during anomalous volatility spikes.
3. Input Order Parameters:
- Set the Base Order Size to 100 USDT (or scaled to match your specific portfolio size).
- Set the Safety Order Size to 150 USDT.
- Set the Price Deviation to 2.5%.
4. Configure Advanced Settings:
- Input the Max Safety Orders Count as 5.
- Set the Safety Order Volume Multiplier to 1.5.
- Set the Take Profit percentage to 1.5%.
- Set Take Profit Mode to "Percentage from total volume".
5. Execution Verification: Ensure the "Investment Amount" matches the calculated maximum capital requirement. Deploy the bot.
System execution latency and exchange fee structures directly degrade backtested performance margins; optimization must account for these friction costs.
Monitoring and Adjustment
Deployment is not the end of the process. Active monitoring is required to evaluate whether the configuration aligns with prevailing market conditions:
- Check fill logs daily. If safety orders are firing in rapid succession, the deviation may be too narrow for current volatility, or the asset is entering a deeper correction than the grid can absorb.
- Track cycle completion rate. If the bot has not closed a single profitable cycle in two weeks, the TP target may be too tight relative to the depth of accumulated orders, or the market has moved beyond the bot's configured range.
- Reassess during regime shifts. A configuration optimized for ETH trading in a $2,800–$3,400 range will behave differently during a breakout to $4,000 or a breakdown to $2,200. Adjusting deviation, order count, or scaling multipliers to match new volatility bands is not optional maintenance — it is part of the strategy.
Risk Evaluation and Performance Verdict
A strict mathematical analysis of this DCA configuration demonstrates that it is not a profit guarantee. It is an execution tool that trades time for price optimization.
In a sustained bull market, a simple buy-and-hold strategy will consistently outperform this DCA bot. This is because the bot's safety orders are never triggered, leaving the majority of the allocated capital idle in USDT. Conversely, in a catastrophic, non-reverting bear market, the bot will rapidly execute all safety orders and become a passive, underwater holding.
The strategy is optimized specifically for mean-reverting, volatile consolidation phases. It performs efficiently when ETH fluctuates within a defined range, repeatedly triggering safety orders during minor dips and exiting during local retracements. Practitioners must monitor the macro trend and disable the bot if the structural support levels of the underlying asset break down entirely.
Setting up a Binance DCA bot David's strategy for ETH is not a set-and-forget mechanism — it is a capital deployment framework that demands structural awareness of the market regime in which it operates.
The configuration outlined here — 2.5% deviation, 1.5x volume scaling, 1.5% TP from average entry, 5 maximum safety orders — represents a balanced starting point. It is not the only viable configuration, nor is it universally optimal. But its parameters are internally consistent, its capital requirements are calculable in advance, and its behavior under stress is predictable. For a trader approaching automated DCA accumulation on ETH for the first time, that predictability is worth more than theoretical upside.